
Crepe Flower DIY
I have received so many compliments and requests to buy these crepe paper flowers (originally for Neiman Marcus) that I decided to create a DIY guide to walk anyone who might make these beautiful flowers at home! Download and print the templates below, and make sure you have all of the materials on the supply list. Let’s make flowers!
Supply List
- Hot glue gun
- 2-4 rolls of crepe paper (I get mine here) You will need one yellow for the center and then I like to mix the colors a little for the petals (depending on the look you are going for – be creative)
- 4″ – 6″ half ball foam (I prefer smooth foam and hollow like this) The size depends on how big you want to make your flowers. For 24″ + diameter, I recommend the 6″ center.
- Sharp scissors
- Elbow grease
Once you have all of the supplies, download the template here, print out and cut the petals and parts (pay attention to the grain of the crepe paper and make sure it matches the template) and let’s get started!
Flower Assembly
- Plug in your glue gun and make sure it is ready for use.
- Start with the yellow center circle. Stretch and pull the paper to cover the foam. (If you purchase the premium crepe paper, you can stretch it quite a bit without tearing, which adds to the natural look of the petals later) Make sure it is properly centered on the foam, and then pullet the underside and secure with hot glue. Continue around the dome until the yellow paper covers the entire top.
- Next, start to glue the stamen around the perimeter of the dome. You want to stretch this slightly, but not too much, as this part is more likely to tear. It will look a little like this when you are done.
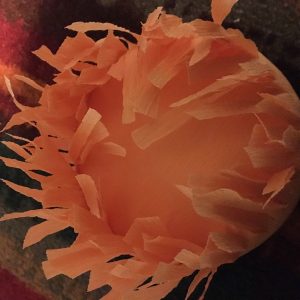
- Now we start with the petals! Starting with the smallest petals, pull and stretch each petal against the grain. (This stretching is what gives the crepe paper the natural petal look and feel, so don’t be shy) Evenly space eight of the petals around the perimeter of the dome, and then pull and wrap them closely to the center as you start to glue the first set of petals around the dome.
- For the second layer of small petals, glue the petals in the space between the first set. Staggering like bricks to create more of a natural look.
- Continue using the same 8 petals per layer as we did for the small as we move onto the medium and then large petals. A little tearing is okay if you get too rough with the petals, as this happens to petals in nature! Imperfections just add to the natural look of these flowers.
- Feel free to alternate colors and petal cut types to add to the natural look and to add texture and depth.

- Contunie until you are out of petals, or until the flower has reached the fullness you desire!


When you are done, please share your results, and pass along this tutorial to your friends!
Go out and make stuff.
3 Comments
Join the discussion and tell us your opinion.
I gotta favorite this website it seems extremely helpful invaluable. Vernon Angelbeck
Good luck!
Thanks for sharing.